tuning & tips
This section is for helpful information on choosing arrows, setting up your bow, and getting the most out of your set up.
Omega Carbon Arrow Chart
The chart below is a quick reference to give you a rough idea what arrow will work for your bow. Start at the left side and find your bow weight with a 125 gr tip. Follow this over to correspond with your arrow length. That is the approximate arrow size.
Adjusting for tips
If you don’t use 125 gr tips, for every 25 grains MORE in point weight that you shoot, ADD 3# to your bow weight when referencing the chart. For every 25 grains LESS in tip weight, SUBTRACT 3#. For example, if I’m shooting a 40# Omega and want a 200 gr tip, I would reference the chart for 52#, instead of 40#. This is why the chart goes up higher in weight than I actually offer bows. Keep in mind, Omegas and carbons are fairly forgiving, and “close counts” when buying raw shafts. Final tuning is up to you and your own personal shot style. Don’t be afraid to try what you have before buying new arrows!
Shooting style really affects which arrow will work for you. As the old saying goes, your mileage may vary!
Older Omega Natives are cut 1/8″ out of center, so please adjust by checking the chart as if your bow was 5# lighter. For example, if your bow is 50#, reference the chart for 45# instead, and it might serve best to also err on the lighter end of the spine range.
Chart
| Draw w/ 125gr | 27″ Arrow | 28″ Arrow | 29″ Arrow | 30″ Arrow | 31″ Arrow | 32″ Arrow |
| 26-36 | 700 | 600 | 600 | 600 | 600 | 500 |
| 31-41 | 600 | 600 | 600 | 600 | 500 | 500 |
| 36-46 | 600 | 500 | 500 | 500 | 400 | 400 |
| 41-51 | 500 | 500 | 500 | 400 | 400 | 400 |
| 46-56 | 500 | 500 | 400 | 400 | 400 | 340 |
| 51-61 | 500 | 400 | 400 | 400 | 340 | 340 |
| 56-66 | 400 | 400 | 400 | 340 | 340 | 300 |
| 61-71 | 400 | 400 | 340 | 340 | 300 | 300 |
| 66-76 | 400 | 340 | 340 | 300 | 300 | 300 |
| 71-81 | 340 | 340 | 300 | 300 | 300 | 300 |
| 76-86 | 340 | 300 | 300 | 300 | 300 | 300 |
For wooden arrows, start with your bow weight plus 5#. This is just a general consensus, and may vary between shooters from +/-0# to +10#. Start long and shorten as necessary.
For every extra inch over 28″, add 5#. And, for every inch shorter than 28″, subtract 5#. For every extra 35 gr tip weight above 125 gr, add 5#. For every 35 gr tip weight under 125 gr subtract 5#.
Example
So let’s take a 45# at 27″ Omega and you want a 29″ wooden arrow with a 160 gr tip, you’ll do the following:
45-50 starting with draw weight
+ 5 for the average Omega spine preference
+ 5 for the extra length over 28″
+ 5 for the extra 35 gr tip over 125 gr
= 60-65 spine wooden arrow for your Omega.
This is just a general figure, and you will of course have to tune it for your own personal set up, but it should get you awfully close!
Bow Care
Omegas are built to last indefinitely, but anything will fail if improperly cared for over time. You should always use a properly designed bow stringer. A stringer with a rubber pad for the limb will help prevent injury as opposed to the two-pocket style stringer. With the small, performance minded tips on Omegas please do not use a two-pocket style stringer for your own safety and that of the bow.
Intense heat or Moisture
Never leave a strung bow exposed to intense heat or moisture, especially for long periods. Unstrung bows that have been left in these kinds of conditions should be given time to cool down before stringing as well. Bows that have had the finish marred or scraped should be touched up with urethane or sent back for refinishing. Using a wax over the finish can help prevent wear and add another level of moisture protection.
Storing
When storing your Omega never leave it on end. This can ruin the tiller and will void the warranty. Bows should be left flat, either on a rack, shelf, or tucked under a bed. Bows can also be hung from the string, with the top look slid down the limb.
Dry fire
Never dry fire your bow. Dry firing means to shoot it without an arrow. This is the same reason not to shoot too light of an arrow. Both of these will over stress the wood within the limbs, and can cause failure. Over drawing the bow is also damaging, and if someone taller than you asked to draw your bow make sure they don’t draw it past the limits of the design.
Bow string
Lighter draw weight models can benefit from a lighter, skinny high performance bow string, however on heavier models these small strings, if improperly padded, can actually cut through the tips of a bow. Skinny strings can also cause nock fitment issues, which may lead to dry fires.
With proper care your Omega should last for generations.
Bow Tuning
A well tuned set up is the most efficient set up, providing the best accuracy and penetration. It should be noted that nocks that are too tight on the string, using plastic vanes rather than feathers, using only one nocking point on the string, or poor shooting form can all result in inconsistent tuning results. If you are unable to form a group, look to these issues first.
Much of tuning is done by adjusting the bow string. To change your brace height, unstring the bow and twist or untwist the string to achieve the desired brace height. Silencers and nock points should be added by the shooter and adjusted by shooting.
Testing
Shoot at whatever distance you know you can consistently produce a defined group (6″ or less). New shooters should start around ten yards and move back as they progress. The more consistent you are, the better you can group. The the better you can group, the better you can tune. There’s no need for gear that’s better tuned than you can shoot.
Start with fletched arrows and then double check afterwards with either a bare shaft (no feathers) or a broadhead tipped arrows (with feathers). If the bare shaft or broadhead arrow groups with your fletched arrows in the center, you are tuned.
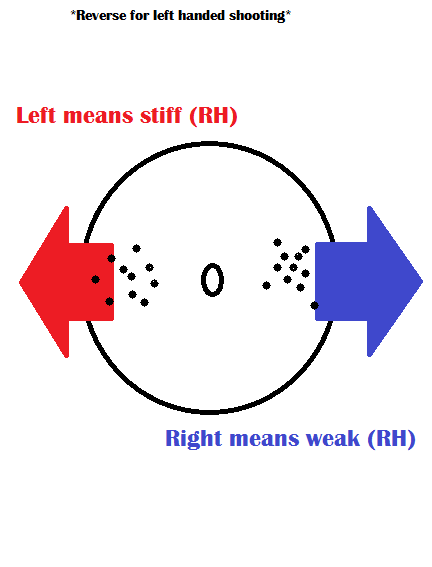
Testing: left and right
The following is for right handed shooters. Left hand shooters just reverse it.
Shoot a group at the center. If you group LEFT the arrow is STIFF. If you group RIGHT the arrow is WEAK. Be careful, inconsistent groups or erratic flight can indicate a false sign. Also, clothing contact or form issues can also manifest when tuning. Try the best you can and revisit it later if you have issues. Remember, the goal is to group not necessarily hit the center.
Testing: Stiff and Weak
For a STIFF arrow you can: raise the brace height, slide your silencers away from the center serving (towards the nocks), trim your silencers shorter, add point weight, or switch the strike plate out for one thinner and/or softer.
For a WEAK arrow you can: lower the brace height, move your silencers in towards the center serving, add more silencers, lighten point weight, shorten the arrow, or switch the strike plate out for a thicker and/or stiffer material.
Adjust a bit at a time until you can group along the center line, even if your groups are high or low.
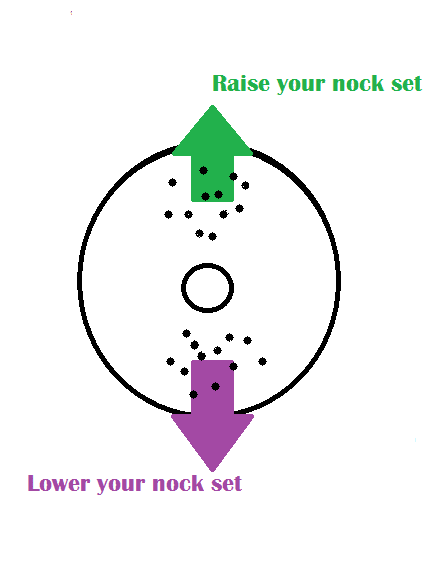
Testing: Up and down
Vertical issues are adjusted with the nock set height. Use two nocking points for a nock set. Using a single nock point can cause inconsistencies. If your groups are high, raise the nock set. If your groups are low, lower the nock set.
If the arrow is flying low and porpoising up and down, especially if you shoot three under, your nocking point is actually too low and the tail of the arrow is kicking off the shelf. Raise the nocking point. If the arrow is flying low but straight, then you can lower the nocking point to bring it up- or just leave it. Here, so long as arrow flight is good you can compensate your aim, or use an extra high nocking point to make your sight picture smaller.
If you have any issues, please feel free to email me!
Draw Weight and Arrow Design
When you’re starting, it often comes up: how much bow? Here are a couple ways to can check to see whether the bow is too much for you or not.
First, if you’ve never shot a traditional bow before, it’s inadvisable to start over 40# at your draw. You will learn much faster and be ready to hunt much sooner. Now, if you’re coming from a compound a good formula would be to go around 60% of your current comfortable draw weight. So a fellow shooting a 65# compound would be looking for a bow around 40#, which is plenty to hunt deer. Starting light, as long as it’s legal, is never a bad idea.
Used by serious hunters
Luckily, bows in the 40# range aren’t just for getting started, they are used by serious hunters every year to bag everything from whitetail bucks to hogs and big elk! A well tuned arrow tipped with a razor-sharp two-blade broadhead like the Tuffhead will blow through a big bodied buck! Always check your local regulations. Lean, razor sharp cut on contact broadheads require far less energy to penetrate and have been proven deadly effective on big game over the centuries.
Power
A little reference as far as actual delivered power: the average 40# Omega should deliver around 30 ft-lbs of KE. This is the same power of a straight-limb longbow or low end recurve in the 50+# range.
Need more information? Check out our FAQ page.